The Wolf Den has moved… not physically but our virtually. We are now at Our Wolf Den! Thanks for making the journey with us.


The Wolf Den has moved… not physically but our virtually. We are now at Our Wolf Den! Thanks for making the journey with us.

Our driveway runs in between our house and our neighbors which has earned in the nickname of the alley. After using it as a place to store extra supplies when a project is in mid swing we have decided that it is time to clean it up a little. There are a ton of small projects to tackle but the first one I set my teeth into was the side entry door.
The side door was anything but a pretty sight. It was old and discolored the door itself seemed to be steel that had never been painted.

The design over the glass was yellowed with gross caulk oozing out from under it.

It was embarrassing and needed to be dealt with. Unfortunately it had been easy to ignore these past few years.

I made the decision to paint the door dark gray. In fact it is the same dark gray we used on the front deck called Dark Granite (780F-6) by Behr. The waterproofing deck paint did a pretty good job the steel door.

When painting a steel door it is important to make the coats as light as possible, this will prevent drips and drops. The second coat I was able to do a little bit heavy but not much.
I also painted two coats on the inside of the door.


After these were dry I painted the design over the glass with some leftover Dutch Boy White Lullaby kitchen paint I had. Two coats of the white and I was able to scrape off the extra paint that was on the glass. I will admit that I had to go back a touch a few areas up. It seems my paint scrapper was built wrong for this area. In fact I did break a blade.

I didn’t have the patience to peel all the paint of the glass in one sitting so I took a break to paint a third coat of gray paint on the door. Unfortunately it rained right after I was done and a fourth coat was needed on the outside.
The wood work around the door also needed a fresh coat of paint. For some reason when we had the siding redone the “lovely” company we worked with did not cover all the exposed wood with aluminum that we paid for. At that point we just wanted them gone and it wasn’t worth fighting with them to fix this. A few coats of waterproof paint in a bright white and it was as good as new.

What do you think, big difference?

It makes me much happier. We still need to find a storm door to replace the one original one that fell apart. Personally I’m likening the look of a glass one.
Other Outdoor Projects:


It took us a week before we tackled painting the fence. Bright and early Saturday morning Wolfy and I awoke and headed out into the yard. Armed with 10 gallons of Cabot Solid Stain in Cape Cod Gray and our beloved paint sprayer we started our project.
We were apprehensive; anyone who has paint fencing can tell you it takes a long, long time. Fortunately the paint sprayer allowed us to paint the inside of the fence in 2 ½ hour. I will admit I called and bragged to my parents about my fence painting speed.
The process I have found that works the best for us is a quick coat going side to side.

Once that is dry (which didn’t take long, this wood was thirsty) a heaver coat going up and down only concentrating on one or two boards depending on the width of our sprayer.

It took 8 gallons but the fence was done.

It turns out however that the paint I had originally painted the upper part of the fence with was not the same color as the Cabot stain. The original paint was a brighter bluer gray…

While the Cabot Cape Cod Gray is more of a brown tone.

I like it, I probably wouldn’t have picked it out but it looks good. I like how in the distance it is a softer color, it is not a hard color that drawls your eye the way it would have been if we had went with white, or even the way it was before painted.
We still have to paint the outside of the fence, but I’m going to leave that project for another day, along with taking out the white posts that mark the old yard.
After almost 4 years of living at the Den we decided it was finally time to fence in the whole back yard. It was the reason we bought the house, but up until now only about 1/3 of the yard was fenced in.
The Friday before a three day weekend found Wolfy driving around to two different home improvement stores to gather our supplies. I didn’t quite understand what we had gotten ourselves into until I saw the trailer loaded down with 26 6X8 fence panels. Then I actually put together all the numbers that had been in my head… 200 linier feet of fencing, oh crap.

I’m not going to go in depth on how to install a fence. I’ll share an overview of what we did but if you don’t have a clue please do more research! Take this as anecdotal evidence that if the Wolves can do it, so can you.
Step One: Cut a hole in the box Figure out where you fence is going to go.
To do this we put stakes into the ground (that’s a lie, we used garden tools i.e. shovels in place of stakes) and connect with string to indicate the perimeter. I followed that up by using marking paint on the grass so we could remove the string and get it out of the way.

Note: We did not put the fence on the edge of our property. We met with a fencing company two years ago to get this quoted (scary!) and were advised to keep the fence away from the property line so that you can still mow on the outside of your fence. You never know when your neighbors might move and the new neighbor could be a real jerks. Ah, town living.
Step Two: Take down the old fence. Pretty self-explanatory, we needed the old fence out of the way to put in the new one.
Step three: Install the first panel. A multiple step step.
This panel needed to be attached to the wood fence we had installed a few weekends ago. It was also on a hill. First we needed to dig out the hill enough to install the fence in the ground. This area is highly dog sensitive by bury the fence we are giving ourselves added security that if Makanda decides to dig she isn’t going anywhere.

Once the area was dug out so it would be fairly level with the existing fence we started digging the holes for the post. Allow me to introduce the newest member of our family, Errr… we never did manage to name it but this is our very own auger. We purchased it from Home Depot for around $250 which I think was a great investment.
You may wonder why we bought one. To save time and energy. If you have ever had to dig a hole with a manual post hole digger you know that gets old real fast. So why didn’t we rent one? This one is smaller than the ones we were planning to rent. Wolfman was able to operate this on his own. We were able to use it Saturday and Sunday without worrying about having to get it back to the rental place. And most importantly, this isn’t our forever home. We will move at some point. And that place will need a fence, or a deck, or a pergola, or trees planted – all of which this auger will come in handy for. Buying the auger was about twice the fee to rent one, so if we ever need it in the future it will be paid off.
Public service announcement: If you plan to dig more than 12 holes, please get ahold of an auger. Rent it, buy it, but trust me the time and effort it saves will be worth it.
Okay back to hole digging.
Once the holes were dug we added a 4X4X8 to each hole. The fence panel went up and was installed slightly differently than any other. The first post was about a foot inside the panel. The end of the panel butted up next to the already installed fence so it would look seamless. The panel was screwed in there using 3 inch deck screws and to the first post we installed. The second post was held level and lined up so the panel would be on half of the 4×4 (a second panel will attach to the other half) and screwed in. The panel was held in a level position and a bag of dry concrete was added to each hole.

This is called dry setting. It allows more wiggle room while working on a project while still keeping the posts level. When the project is done you can come back and water the holes or like us just wait until the first rain. After adding the concrete to the hole I filled the hole the rest of the way with dirt and we moved on.

Step 4: Just keep digging
Really that’s it. Measure you next panel (don’t believe the advertised measurements, even ¼ inch can mess you up) and mark that distance from the end of the current panel. Dig your hole. Attach a panel. Dry set the holes. Move on.

The two sides we did were 75 feet long and the back was 45 feet. Wolfy and I managed to call in a favor to our good buddy Gaston and he came over to help. We started Saturday morning at 7 am and called it a day at 8:30pm. Sunday morning started at 7:30 am and went to 12:30 pm. Three people worked 18.5 hours to accomplish that. The motto which kept me going was “This is saving me at least $5000”. Sweat Equity.
Installing a fence is hard hard work, I would recommend having three people if you are working with panels more than 4 foot tall. If Wolfman and I had to install these ourselves without our friends help it would have taken a lot longer. We ended up with a system of the two men holding the panels up and level while I screwed them in place.

Other Outside Projects
The conversation started out like many before, “Honey, you know that blog couple that I read, well I had an idea…” terror briefly flashed through Wolfy’s eyes. Then I pulled out my Kindle to show him this.
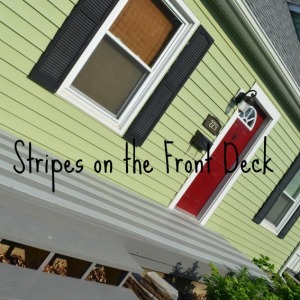
“I want to stripe our front deck in shades of gray.”
“Okay?”
And the topic was dropped. I knew Wolfy wasn’t feeling it, and I debated over the next couple of days. Was he apprehensive because he truly didn’t like the idea, or was the apprehension because he couldn’t see the vision I had?
The next time I went to Home Depot I took a side trip from my mission to pick up 2 x 8s and found myself in the paint department. I was pleasantly surprised to find that waterproof deck paint was sold in sample sized containers and it was tintable. There was no need to make a gut reaction, bite the bullet and buy two gallons of paint (like I had mistakenly done previously with the red) now I could get a sample, in any color I wished, and try it out before committing.
I decided on Behr Anonymous (780F-5) for the lighter gray and Behr Dark Granite (780F-6) for the darker.

Once home I dropped the wood off to the Wolfman and left him alone to do some test painting. I will admit I was worried. Worried that the red would show through, worried that Anonymous was too light, or maybe too blue. But once two coats were on, man what a difference. I was in love.
“Whatca doing?” Wolfy asked curiously as I drug him over to show him “The Vision”. He liked it and was in fact excited by the look now that he could see what I was talking about.

So I pulled the trigger and bought a gallon of each color. The light color went on first. I applied it heavily in-between the deck boards to make sure the wood color would not been seen. After two coats of the light color I moved on to the dark color. Thankfully it was hot hot hot outside so the coats were drying very quickly. The deck boards, the stairs, and the facing boards were all covered with two coats of the dark paint.

The Dark Granite color matches the shingles almost perfectly and due to the house being slightly higher than the street, all you see is the dark color when driving by. The lighter stripes become a sweet surprise when you walk up to the deck.

I wanted to shout out to Young House Love for answering a comment and helping me out, I know I didn’t follow all you directions (I just went right over the stain since the test pots went so well) but your reassurance that the gray would look good helped me take the leap when the hubby was doubtful.
And now I have a question for you all. I still need something in my garden bed, but what? As much as I like dark mulch I was really hoping for a gravel or stone so I can use a leaf blower to remove the leaves in the spring time, any thoughts on color, or should I just man up and get the mulch? Remember the idea is to sell this house in a few years, so if you were looking to buy it what would you want there?
Next question. I have two tons of flagstone that I bought last year to make a patio. The plan is to make it in the back yard off the rustic looking pergola. But (you may be able to see it in the picture) I have some laying in front of the steps.
Option 1) Use this flagstone to make a small patio/landing pad in front of the stairs
Option 2) Lay gray pavers to make a small patio/landing pad in front of the stairs
Other Outside Projects
I linked up here
We work in spurts here at the Wolf Den. Last week I woke up from the winter slump (woo-hoo nice weather) and hung the string lights of the pergola. That egged me on to finish building the pergola. Yeah… it has been so long you forgot that the pergola wasn’t done (except the blaring need for paint/stain/protective bubble wrap, just kidding on that last one).
The momentum had started. Why only do the privacy panels? Why not take down our pretty vinyl fence and put a wooden fence up too? So Friday night after work we hit up Menard’s (we spend enough money there I feel like I should be greeted with a fancy coffee and my own personal fork truck driver to haul my purchases around) and loaded up the truck with wood for the privacy panels and the fence.

Sorry for the bad cell phone picture!
We were up bright and early Saturday morning to make the most of our day off.
The first step was to remove the old fence panels. It was a bitter sweet moment. I loved these panels but unfortunately the dogs could bust the bottom pickets out and make a run for it.
This step took way longer than expected. For some reason a majority of the bolts were stripped out! How did this happen? I know I didn’t do that when I installed them (hopefully?)! Wolfy showed me a trick that saved my sanity. Get a drill bit the same size as your screw (the part that goes into the wood not the head) and pretend you are installing the screw. If you are using a metal bit this should pop the head off and push the end either into the wood or in this case down the vinyl sleeve. I was thoroughly impressed. Plus the pyro in me liked it watch the paint bubble up on the screw and it start smoking before it freed itself.

Once all the screws and brackets were off it was time to add extra support. The only vinyl covers that had 4x4s inside them were the gate posts. We wanted to screw the panels directly into the posts so it needed to be beefed up. Wolfy poured cement mix into the covers and then slid a 4×4 into each. I went around with water and gave it a drink so the cement could start to set up.
Then we turned our attention to the wooden fence panels. We installed them the “wrong way” on purpose, the nice smooth side that should be facing your neighbors in toward the inside on our fence. This was twofold to make it harder on the pups to try to pull a Houdini. One: the braces are on the back so they cannot use it for a ledge to get over the fence. Two: installed this way when the girls jump on the fence (because they are bad girls and they will and have) they are hitting the wood the same directions that the nails went in. Repetitive jumping will not cause a picket to get loose. Now, it may break but the nails shouldn’t come out.

The hardest part was the gate kit. While the directions said it was only going to take 20 minutes to assemble we were still cussing at it an hour and a half later. However, once we got it installed it was worth it. It actually works!!!!! I don’t think you share my excitement. Our gates never worked before you see. The fancy vinyl gates sagged immediately after installation and the latches ripped out of the material. So to have a functional gate that doesn’t involve three artfully applied bungee cords is pretty spectacular to me.

Using the paint sprayer I was able to get two gallons of exterior deck paint in a Cape Cod Gray onto the fence. It was enough to cover the inside but not the outside. More paint is on the list.

This project has inspired us to fence in the rest of the yard (currently only half is fenced in). I will be updating you on that once it is complete. The puppies are excited about the idea of having a larger space to place “tackle the sister”.
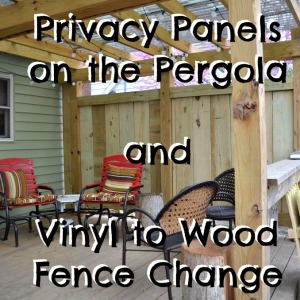
The next project we jumped into was the privacy panels on the deck. When we finished the deck last year we set the 6x6s to act as the base of the panels but we never finished the process. With more energy and a year of using the deck we knew our original plan was still the way to go.
The panels themselves are 2x8s that were cut to 4 ½ feet each.

They were installed on the center on of the 6×6 with a 2×4 behind them for support.

Another 6×6 was added to the top with a 2×4 brace behind it.

We also added a few more boards here and there to make sure Shawnee and Makanda were safe from the temptation to leave their property.
So that’s it. As I sit here Monday night nursing my sore body I’m still planning on taking on the rest of the fence project in a few weeks. I think Memorial Day weekend may be the weekend the Wolves dig holes. It is looking to be a two year tradition. And trying to figure out what I want to do color wise with the back deck.
Other Outside Projects
(By the way you get so many bonus points if you that first part triggered a response of “Over at the Frankinstien’s Place” and even more if you were looking for your lighter/flashlight.)
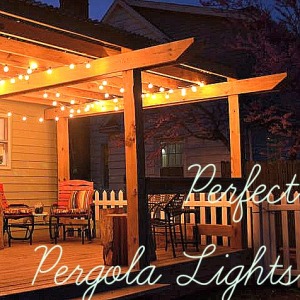
Whenever I thought about my perfect back yard deck I saw the pergola we built, but I had a vision of the perfect lighting. The lights that I wanted unfortunately are impossible to find in my small town. And while I like to order things online I was afraid to order something like this. What if it wasn’t perfect? After all I had settled on several different types of string lights only to take them down and return them.
Then at Target I found them. The perfect lights I had drooled about on TV shows, magazines, blogs, and well Olive Garden. Just light bulbs on a string.

We ended up buying 4 strands of lights and that was the perfect amount.
Before we got the siding we wired new plug-ins outside. Wolfy hooked up power for the flood light and then right next to it there is two outlets. The flood light and the outlets are on separate switches so they can be turned on independently.

Hanging the lights was simple. I used wire clips that we had left over from running electric lines for the fans upstairs. They are padded and keep the wire safe and secure.
A word of warning – be very careful while hanging these lights. The glass globes are super thin. I broke two. Thankfully 4 strings was just a touch too long (not a lot only about a foot) so I was able to remove the broken blubs and use the two “extra” lights from the end. I would love to find spare bulbs, but at $10 for the string, I may just buy another string and swap out as necessary. I would have really loved it these were LED instead.

Anyone else have a Goldilocks moment with something so simple as lighting?
Other Outside Projects
OMAC, Once a Month Cooking, Session Cooking, Freezer Cooking all different names for basically the same thing. Getting food made and in the freezer to make life easier.
I decided I wanted to do this. We get home from work it is late, we get cleaned up and in comfy clothes (because really work clothes don’t stay on for long once we get home, it is a race to get our comfy PJs on to relax, anyone else like this?), dogs loved on, then cook supper, do dishes, barely have enough time to watch some TV, and then it is time for bed. Grr… So a lot of the time I don’t want to cook. We eat out, order in Pizza, eat some weird TV dinner thing that has been in the freezer far too long, or more often than not we eat on of our three go to meals – Popcorn, Chips and Salsa, or Pepperoni and Crackers! So some form of freezer meals sounded good.
The first try was loading up at Sam’s every 3 months. And when I say load up, I mean load up! We literally did not have to buy meat again for those three months. I would crock pot up a roast for Fajitas and then freeze the leftover in individual bags, same with ribs, pork tenderloin, and browned hamburger meat. It made life a little easier. But the stuff in the freezer was hard to keep track of, and other than those few things I still have to cook everything.
Some more research lead me to Once a Month Cooking and Freezer Cooking, and I think I was able to come up with a system that works well for our lifestyle here at The Den.
I don’t need everything to be cooked. My Stir Fry and Chicken Scampi for example are something I worried about freezing. But what takes so long there? The prep work.
Here is how the first freezer stocking event went:
The first step was to invest in an upright freezer. It would be easier to see everything, keep it organized, and hopefully stay on track. Luckily there is a big box store going out of business nearby so I was able to score a great deal. Otherwise we’d still be waiting to start this plan.
The next day I stocked up on groceries and came home to get the meals together. Wolfy helped all day so if you are by yourself be warned it will take a while.
I started prepping onions while Wolfy found a cleaned out the proper cooking devices.
We like onions in our food so I chopped three bags of onions (9lbs I think) in the food processor. I put these in a bowl and just took what I needed for each meal. The left overs were frozen.
What we cooked:
Other meals were assembled for example Stir Fry:
Other meals like that:
We ended up making enough for 52 meals. Can’t beat that. That is 52 suppers that are ready or almost ready to eat. That is a minimum of 7 weeks of food. I say minimum because a lot of those meals will have leftovers and then there will still be the days that I just want a salad for supper. Plus we have the 25 fish fillets for Wolfy that we purchased while in Destin during the beginning of March.
I also made up Sub bread so we could take sandwiches every day for work. The goal is to get ahead of those and have several in the freezer.
Right now on every other weekend I plan to make one or two more types of meals to add to the freezer. This will do two things. One, it keeps the number of meals in the freezer up so we don’t need to do an all-out cooking day. Two, it adds to the verity of the meals we have to choose from. For example last weekend I made a huge batch of Chili which worked out to be 7 meals for us and more than made up for what was taken out of the freezer in the past week. Next time I plan to make a bunch of hamburger patties and chicken packets up so we have something to grill as the weather gets nicer. I also plan to make a few batches of Amish Friendship Bread up so there are plenty of regular sized and mini muffins frozen for snacks and breakfasts.
Why every other week? That is when I am going grocery shopping. I have it figured out that I still need to go to the store every other week to stock up on soda (yes, we still drink soda, don’t judge), fresh veggies, and whatever ingredients are needed for a few more meals.
So what do you think? Is this something you do at home, have done, what to do? Is this journey even something you want to hear about? If so I am more than happy to share my freezer recipes as I figure them out.
How did you fair in the Winter Storm / Snowstorm Ion? I thought I’d show you some pictures of our interesting weekend. This is the most snow we have had in 35 years in central Illinois, and record breaking cold temperatures.
The snow started on Sunday. Around 8:30 when I got up to let the dogs out there was a good 6 inches on our front deck. But at this point the temperature was still pretty good and the dogs were able to play and have a good time in the fresh snow.

About 2 hours later I could hardly stand to be outside taking pictures. The world looked like this.

Monday morning found us snowed in and most of the roads closed. It was so bad Sunday night that they stopped the snow plows and pulled them off the roads from dusk until dawn. The wind chill was a -35 and the wind was blowing hard. I was able to go out and get some more photos, but by the end of the day the landscape looked different do to more drifting.


My faith in humanity was restored during this snowstorm. I saw lots of people out helping their neighbors. It seemed like the good deeds were being passed around. I have to say a big shout out to our neighbor when saw us struggling with digging our car out came over while we were taking a warming break inside and used his snow blower to remove the snow from our drive way. Thank you Sir!
It was really nice to see our community banding together to help each other out.

I hope everyone is safe and warm by now, I really hope you stayed safe and warm during the weather. I’m not sure where you are, but for us the Weather Channel says it is going to start snowing again this afternoon and some ice later in the week. With our main roads and highways still solid ice, not the news I wanted.

Stay safe, stay warm!
We love to watch TV together. When we laid out our living room we centered the TV on a large wall and spent a lot of time looking at. Getting tired of the extra unusable space next to the TV we decided on building in some shelves. A simple shelf project lead into creating a shelving unit with the appearance of built ins. Over all it was a pretty simple project. The hardest part was finding boards that were straight.
The storage was designed for DVDs. We lucked out – see the bump out in the wall? That is the perfect depth for a DVD. 1X6 boards also worked perfectly. We kept things really simple. 1X6s cut just over 4 feet with L brackets holding it up. We used a DVD case to determine the height between the shelves. I held the board level, Wolfy marked the holes, predrilled, and then we were able to screw the shelf to the wall using 3 inch construction screws.


With all the supporting in the back of board we decided to use our Kreg Jig to drill support holes in the ends of the boards. One side ends up getting screwed into the wall the other side will get screwed to another board.

Once all the boards were installed ( and a long debate) we painted the unit (and the wall behind it) white, added crown molding to finish it off, and caulked it.

I pretty happy with the way it turned out. Once we loaded it up with DVDs and knickknacks it started to look like us. We left enough room next to it to fit out 70” TV which was our Christmas present to each other.

So what do you think? Do you have something similar in your home? Would you want something similar in your home? Or did you have it and demo it?
